

How To Connect Printer To Laptop Windows 7
Solusi
You lot can share the printer connected to the printer server (A) with the client PC (B) continued to the same network.
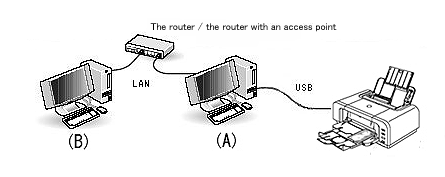
(A) Print sever
(B) Client PC
REFERENCE
The computer straight connected to the printer with a USB cable is called "Impress server" (A) and the estimator on which printing operation is actually performed is called "Client PC."
Follow the steps below to enable printer sharing.
i. Complete the printer sharing settings on the Printer server.
2. Ostend the reckoner name of the impress server.
3. Add the printer to exist shared to the client PC as a new printer.
Circumspection
Log in every bit an Administrator to perform the setup.
When the client PC is Windows 7 and the print server is Windows 7
Canon iP4700 Serial is used as an example of the printer to be shared.
- Preparations -
Both Impress server and Customer PC must have either of the following drivers installed, namely the ane downloaded from Canon website or the i included in the Os. Which driver y'all should install in depends on the printer / Os.
For details, run across our website.
- To install the downloaded driver in the client PC, check "Select printer port" in the Installation Complete window, and then select LPT1 in "Transmission Selection" to consummate the installation.
- To install the commuter included in the Os in the client PC, select LPT1 in "Add Printer" to complete the installation.
1. Complete the printer sharing settings on the Printer server.
Let'south make the printer connected to the print server available to other computers.
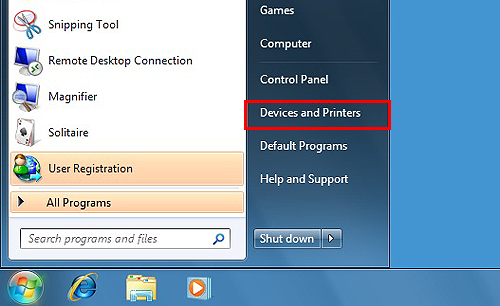
one-1. From the Showtime carte du jour, select [Devices and Printers] .
REFERENCE
The screen looks different depending on the environment you are using.
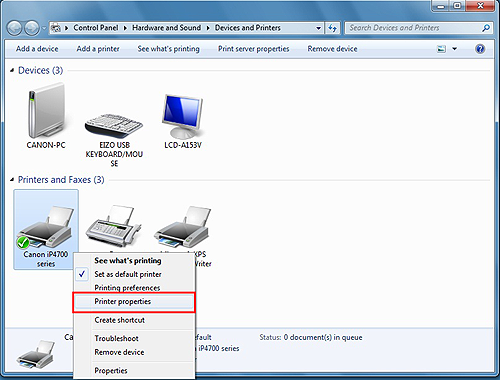
one-2. Correct-click the Canon iP4700 Series icon, and so select "Printer Properties" .
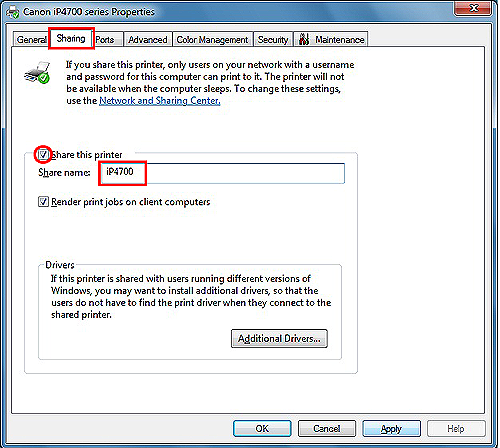
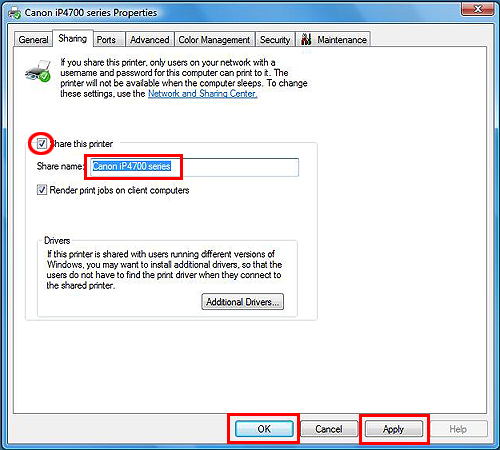
1-3. Select the Sharing tab, check "Share this printer", and so enter the name of the printer you want to share in "Share proper name".
After you enter the proper noun, click "Apply" then "OK" to close Properties.
IMPORTANT
- The iP4700 is an case.
- Make sure to write downwardly the "words" you entered in Share proper noun. Y'all will need it when doing the setup for the client server.
ane-4. Ostend that the following kind of mark is displayed in "Country" in the lesser of the window.
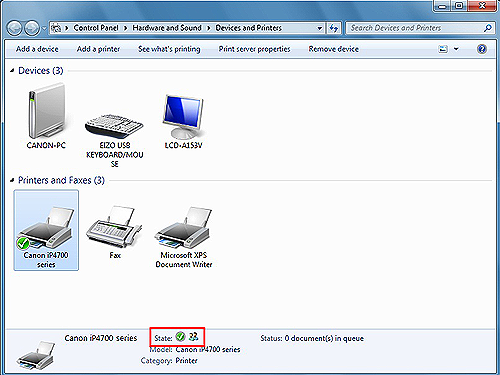
2. This is necessary when you specify the printer in the footstep 3 below.
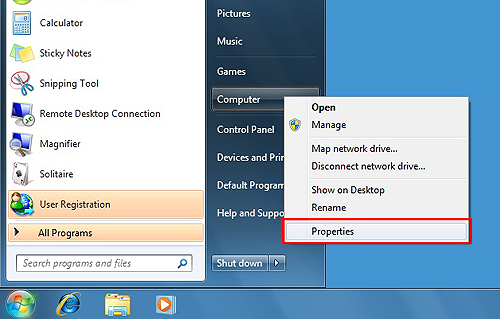
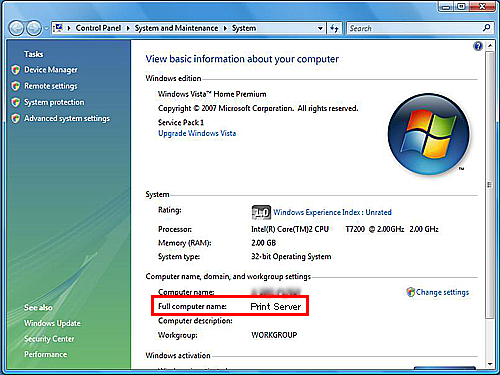
ii-1. From the Outset menu, right-click "Computer", and then click "Properties".
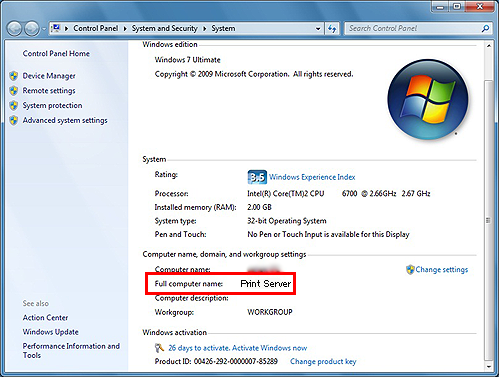
2-2. Ostend the Full computer proper name.
IMPORTANT
"Print Server" is an example.
Make sure to write down the "words" in Full computer proper noun. You will need it when doing the setup for the client server.
iii. Add together the printer to the client PC as a new printer.
Make the client PC recognize the printer on the network.
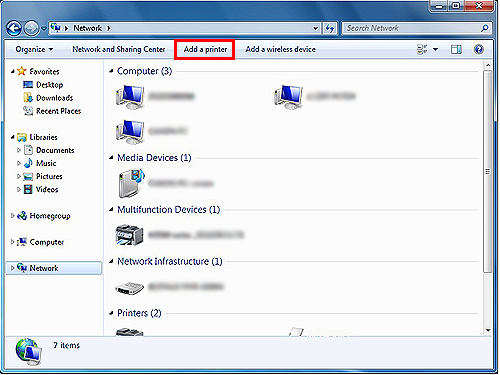
three-i. From the Showtime carte du jour, select "Calculator", "Network", then "Add a printer".
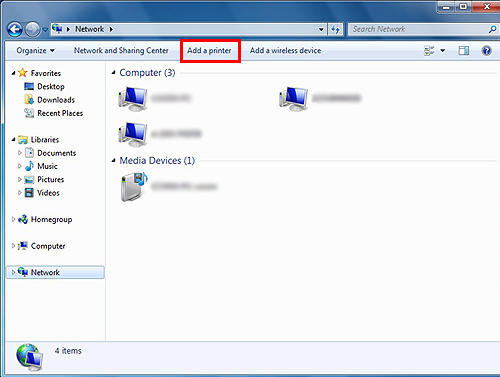
The Add Printer window is displayed.
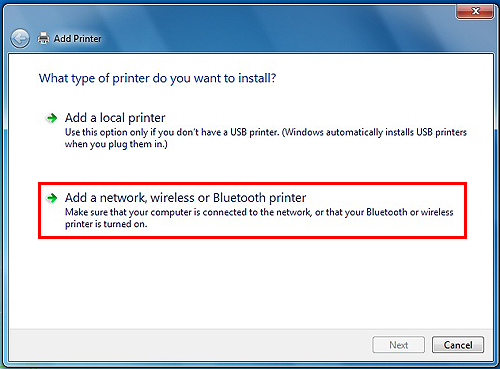
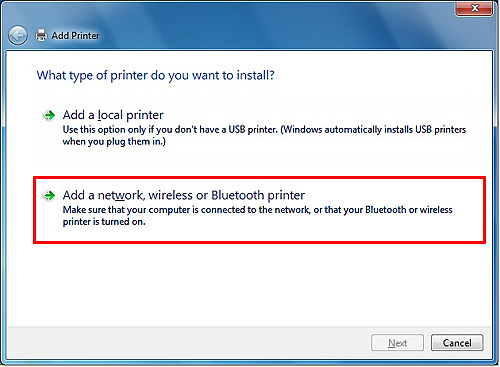
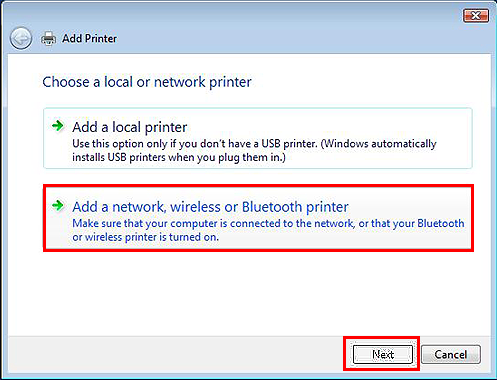
3-2. Select "Add a network, wireless or Bluetooth printer".
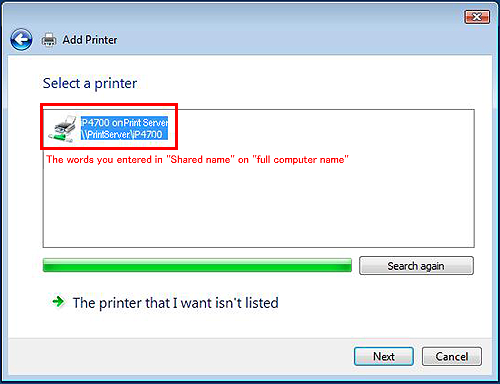
iii-three. Click the icon of the printer specified on the impress server, click "Next".
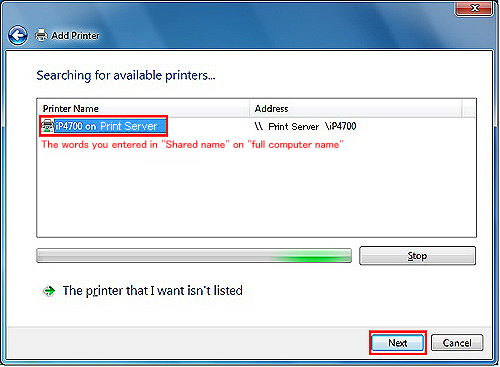
Important
If the printer icon is not displayed, check the connection with the print server. If the trouble persists, ostend whether the account (administrative privileges) of the print server is surely specified on the customer PC.
(It may take time to display the printer icon.)
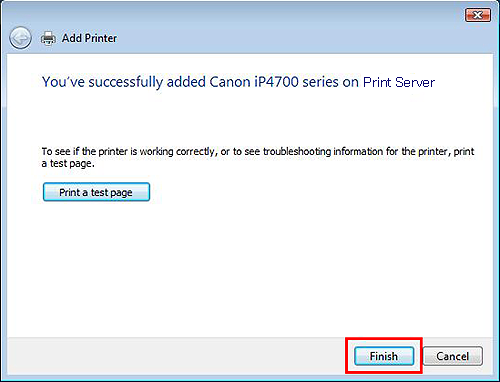
3-4. After following the instructions on the window, click "End".
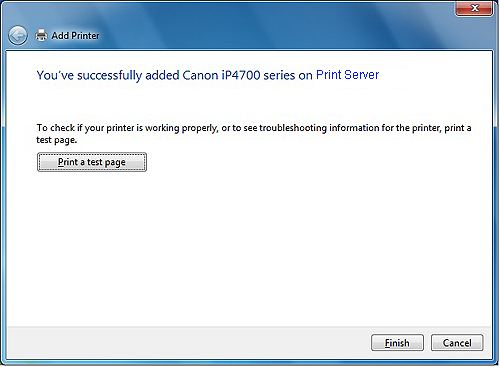
The end of all the settings.
When the client PC is Windows seven and the print server is Windows XP
Canon iP4700 Series is used as an example of the printer to be shared.
- Preparations -
Both Print server and Customer PC must have either of the following drivers installed, namely the i downloaded from Canon website or the i included in the Os. Which driver you should install in depends on the printer / Os.
For details, see our website.
- To install the downloaded commuter in the customer PC, cheque "Select printer port" in the Installation Complete window, so select LPT1 in "Transmission Pick" to complete the installation.
- To install the driver included in the OS in the customer PC, select LPT1 in "Add Printer" to complete the installation.
i. Complete the printer sharing settings on the Printer server.
Allow'southward make the printer connected to the print server bachelor to other computers.
1-1. From the Showtime carte, select "Control Console", "Printers and Other Hardware", so "Printers and Faxes".

The "Printers and Faxes" window is displayed.
REFERENCE
The screen looks different depending on the environment you are using.
1-ii. Select the "Catechism iP4700 Series" icon, so click "File" and " Sharing"

ane-three. Click "If you understand the security risks just desire to share printers without running the wizard, click here".

REFERENCE
This bulletin may not be displayed depending on the environment you are using.
i-four. Select "Just enable printer sharing", then click "OK".

REFERENCE
This dialog may not exist displayed depending on the environs yous are using.
1-5. Select "Share this printer", and then enter the printer proper noun y'all desire to share in "Share proper noun".
After yous enter the name, click "Apply" then "OK" to close Properties.

Of import
- The iP4700 is an example.
- Make sure to write down the "words" you entered in Share proper noun. You lot volition demand information technology when doing the setup for the client server.
ane-six. Confirm that the following kind of icon is displayed. In this case, the icon indicates that iP4700 series get ready to exist shared.

ii. Confirm the total calculator name of the impress server.
This is necessary when you specify the printer in the step iii below.
ii-1. From the Outset menu, correct-click "My Figurer", and then click "Properties".

2-2. Click the "Computer Name" tab to confirm "Total computer proper name".

IMPORTANT
"Print Server" is an example.
Make certain to write downwardly the "words" in Full computer name. You will demand information technology when doing the setup for the customer server.
3. Add the printer to the customer PC as a new printer.
Brand the client PC recognize the printer on the network.
3-1. From the Starting time menu, select "Computer", "Network", then "Add together a printer".
The Add Printer window is displayed.
iii-2. Select "Add a network, wireless or Bluetooth printer".
3-3. Click the icon of the printer specified on the impress server, click "Adjacent".
IMPORTANT
If the printer icon is not displayed, check the connection with the print server. If the problem persists, confirm whether the account (administrative privileges) of the print server is surely specified on the client PC.
(It may have time to display the printer icon.)
iii-4. Subsequently following the instructions on the window, click "End".
The stop of all the settings.
When the client PC is Windows 7 and the impress server is Windows Vista
Catechism iP4700 Series is used as an example of the printer to be shared.
- Preparations -
Both Print server and Client PC must have either of the following drivers installed, namely the one downloaded from Canon website or the i included in the Os. Which driver y'all should install in depends on the printer / Os.
For details, run across our website.
- To install the downloaded driver in the client PC, check "Select printer port" in the Installation Complete window, then select LPT1 in "Manual Selection" to consummate the installation.
- To install the driver included in the Bone in the client PC, select LPT1 in "Add Printer" to complete the installation.
1. Complete the printer sharing settings on the Printer server.
Let's make the printer connected to the print server bachelor to other computers.
1-i. From the Commencement card, select "Control Panel", "Hardware and Sound", then "Printers".

The Printer window is displayed.
REFERENCE
The screen looks dissimilar depending on the environment you are using.
ane-2. Correct-click the Canon iP4700 Serial icon, so select "Sharing".

The Properties of the printer is displayed.
1-iii. Click "Change sharing options" in the Sharing tab.
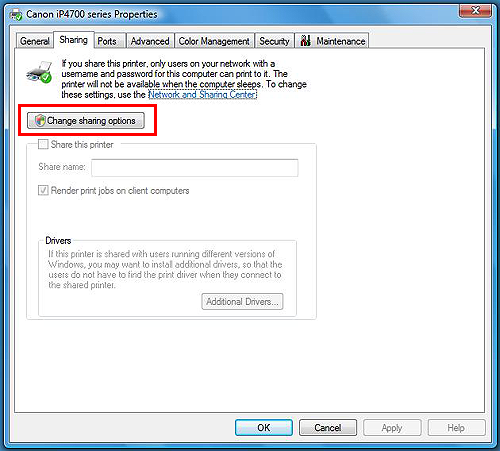
1-4. Select "Share this printer", and so enter the name of the printer you want to share in "Share name".
Click "Apply" then "OK" to close Backdrop.
Of import
- The Canon iP4700 Series is an example.
- Make sure to write down the "words" you entered in Share name. You will need it when doing the setup for the client server.
1-5. Confirm that the post-obit kind of icon is displayed. In this case, the icon indicates that iP4700 serial get ready to exist shared.

2. Confirm the total figurer name of the print server.
This is necessary when you specify the printer in the pace iii below.
2-1. From the Get-go card, correct-click "Computer", then click "Backdrop".

2-2. Confirm "Full computer name".
Of import
"Print Server" is an case.
Brand sure to write down the "words" in Total computer name. You will need it when doing the setup for the client server.
3. Add the printer to the customer PC as a new printer.
Make the client PC recognize the printer on the network.
3-one. From the Start menu, select "Computer", "Network", then "Add together a printer".
The Add together Printer window is displayed.
three-ii. Select "Add a network, wireless or Bluetooth printer".
three-3. Click the icon of the printer shared on the print server, click "Adjacent".

IMPORTANT
If the printer icon is not displayed, check the connection with the impress server. If the problem persists, confirm whether the account (administrative privileges) of the impress server is surely specified on the customer PC.
(It may accept time to display the printer icon.)
3-4. After following the instructions on the window, click "Cease".

The end of all the settings.
When the client PC is Windows XP and the print server is Windows 7
Canon iP4700 Series is used as an example of the printer to be shared.
- Preparations -
Both Print server and Client PC must accept either of the following drivers installed, namely the ane downloaded from Canon website or the ane included in the OS. Which driver you should install in depends on the printer / Os.
For details, run across our website.
- To install the downloaded driver in the client PC, bank check "Select printer port" in the Installation Complete window, then select LPT1 in "Transmission Selection" to complete the installation.
- To install the driver included in the OS in the client PC, select LPT1 in "Add Printer" to complete the installation.
i. Complete the printer sharing settings on the Printer server.
Let's make the printer connected to the print server available to other computers.
i-1. From the Start menu, select "Devices and Printers" .
REFERENCE
The screen looks dissimilar depending on the environment yous are using.
1-ii. Right-click the Catechism iP4700 Series icon, then select "Printer Properties"

1-iii. Select the Sharing tab, check "Share this printer", and and so enter the name of the printer you want to share in "Share name".
After you enter the proper name, click "Apply" and then "OK" to shut Properties.
IMPORTANT
- The Canon iP4700 Serial is an example.
- Make sure to write down the "words" you entered in Share proper noun. Y'all will need it when doing the setup for the client server.
1-4. Ostend that the following kind of mark is displayed in "Land" in the bottom of the window. In this case, the marker indicates that iP4700 series get ready to be shared.
two. Confirm the total computer proper name of the print server.
This is necessary when you specify the printer in the step 3 below.
two-1. From the Kickoff card, right-click "Computer", and so click "Properties".
2-2. Confirm the Full computer name.
Important
"Print Server" is an instance.
Make sure to write downwardly the "words" in Full calculator name. You volition demand information technology when doing the setup for the client server.
three. Add the printer to the customer PC as a new printer.
Make the client PC recognize the printer on the network.
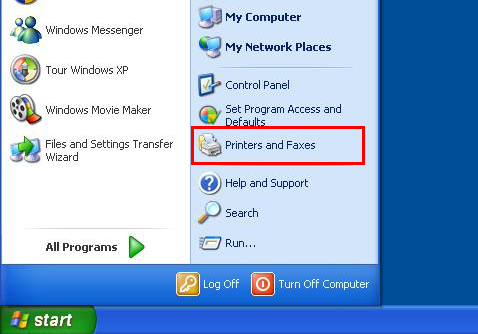
iii-ane. From the Outset bill of fare, select "Printers and Faxs".
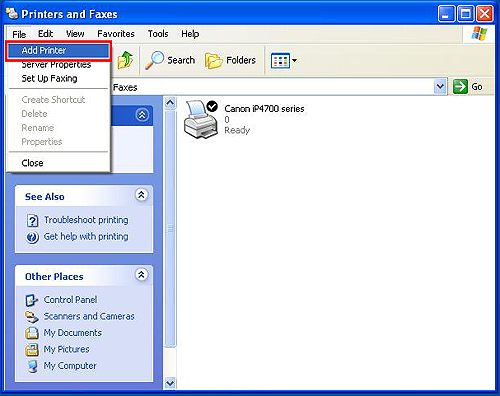
3-2. From the file menu, select Add together Printer.
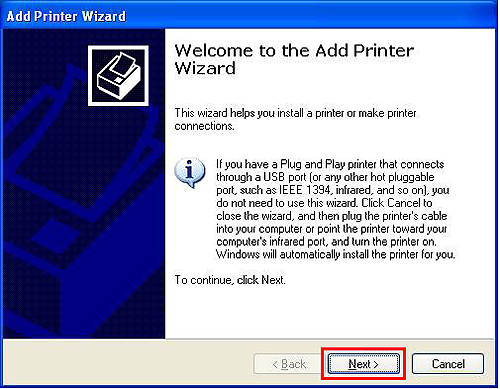
iii-three. The Add Printer Magician will exist displayed.
Click Next.
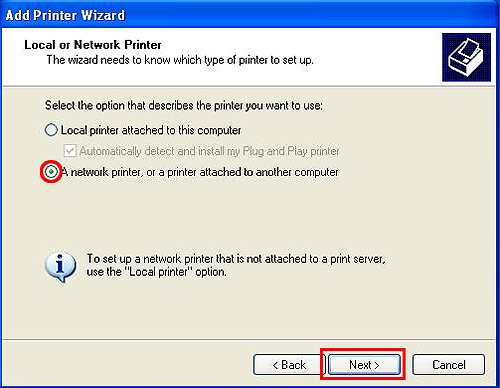
3-iv. Check "A network Printer, or a printer attached to another printer," so click Side by side.
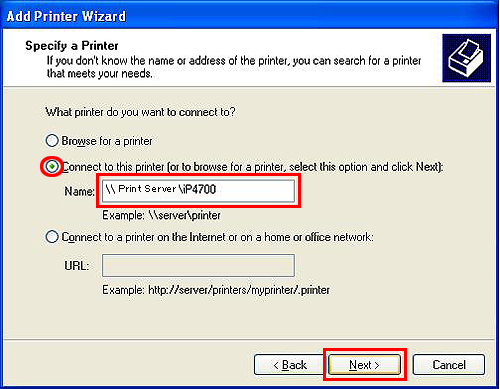
3-five. Bank check "Connect to this Printer (or to browse for a printer, select this option and click Adjacent)," enter the full computer name and the share name you confirmed in the pace two-2 and ane-3 in "proper noun" respectively.
Click Side by side.
IMPORTANT
If you cannot proceed to the adjacent step even after clicking Next, check the connection with the print server. If the problem persists, confirm whether the account (administrative privileges) of the print server is surely specified on the customer PC.
(Information technology may take time to display the printer icon.)
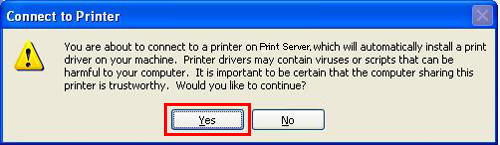
3-6. Click Yes.
3-vii. Afterward following the instructions on the window, click "Finish".
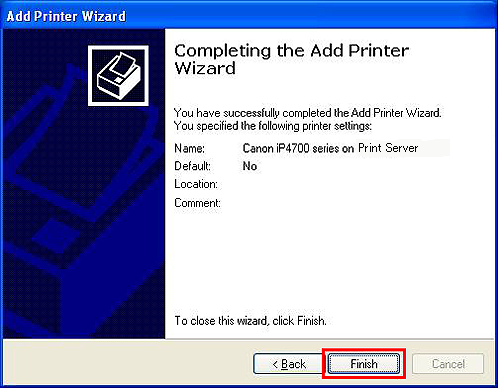
The finish of all the settings.
When the client PC is Windows Vista and the print server is Windows 7
Canon iP4700 Series is used as an example of the printer to exist shared.
- Preparations -
Both Print server and Customer PC must have either of the following drivers installed, namely the one downloaded from Canon website or the i included in the OS. Which commuter you should install in depends on the printer / OS.
For details, encounter our website.
- To install the downloaded driver in the client PC, check "Select printer port" in the Installation Complete window, then select LPT1 in "Manual Selection" to complete the installation.
- To install the commuter included in the Os in the client PC, select LPT1 in "Add Printer" to complete the installation.
one. Complete the printer sharing settings on the Printer server.
Permit's make the printer connected to the print server available to other computers.
1-one. From the Start carte du jour, select [Devices and Printers] .
REFERENCE
The screen looks different depending on the surroundings you are using.
1-ii. Right-click the Canon iP4700 Series icon, and then select "Printer Properties" .
1-3. Select the Sharing tab, cheque "Share this printer", and and so enter the proper name of the printer yous desire to share in "Share name".
Afterwards you enter the name, click "Apply" then "OK" to close Properties.
Of import
- The iP4700 is an case.
- Brand sure to write down the "words" you entered in Share proper noun. You volition need it when doing the setup for the client server.
i-iv. Confirm that the following kind of marking is displayed in "State" in the lesser of the window.
2. This is necessary when you specify the printer in the step 3 below.
2-1. From the Start menu, right-click "Figurer", then click "Backdrop".
2-two. Ostend the Full computer proper name.
Important
"Print Server" is an case.
Make certain to write down the "words" in Total estimator proper name. You will demand it when doing the setup for the customer server.
3. Add the printer to the customer PC as a new printer.
Brand the client PC recognize the printer on the network.
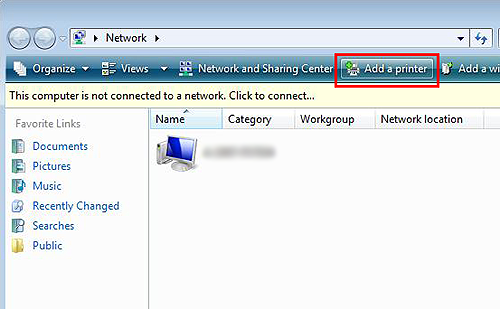
3-1. From the Start menu, select "Network", and so "Add a printer".
3-2. Select "Add together a network, wireless or Bluetooth printer," then click Next.
iii-3. Click the icon of the printer specified on the print server, click "Next".
IMPORTANT
If the printer icon is not displayed, cheque the connection with the impress server. If the trouble persists, confirm whether the business relationship (authoritative privileges) of the print server is surely specified on the client PC.
(It may take time to display the printer icon.)
3-iv. Later following the instructions on the window, click "Finish".
The cease of all the settings.
Source: https://id.canon/id/support/8200726900
Posted by: riveracrourt.blogspot.com
0 Response to "How To Connect Printer To Laptop Windows 7"
Post a Comment