

How To Install Window Trim
The full tutorial of how to install window trim to the interior of your home – it's not as hard as you would think!
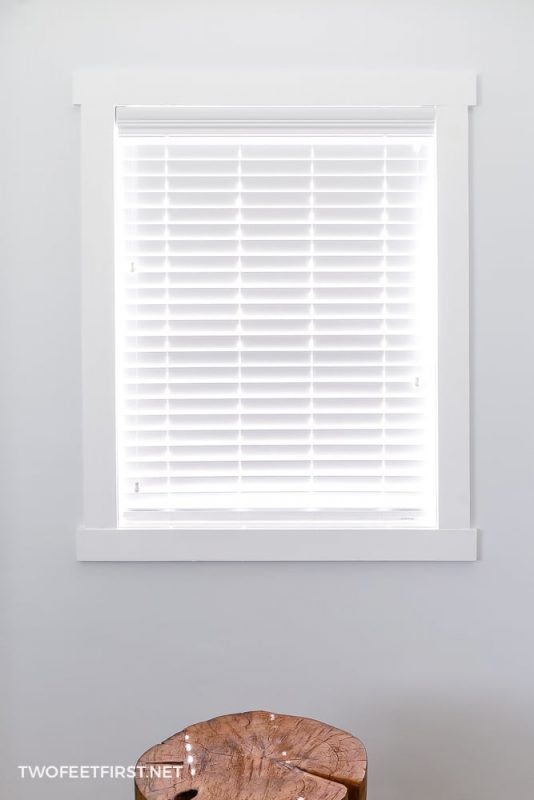
Bright, wooden blinds, freshly-washed window panes, and a lovely outdoor scene to match….but what'south wrong with the picture?
The battered, dingy, interior window trim is ruining the scene and in dire need of replacing!
Follow this guide to install new window trim – you tin can do it yourself one window at a fourth dimension.
And you won't believe how a freshly-renovated window frame changes the view!

If you lot missed the previous mail about installing the window jamb extensions, you probably should check that out first.
Now, let'due south start trimming out those windows.
SIDE NOTE: Nosotros wanted a uncomplicated window trim only you lot tin can choose any style that suits you.
How much does it cost to install window trim?
The cost of installing window trim will depend on the size of the window, only for a simple trim, it should be well-nigh $3 per pes around the window.
So, for a 36″x 48″ window, the cost would be about $42.
Retrieve, this price is if you lot install the trim yourself and it includes the cost of the paint.
Disclosure: This mail service contains some chapter links or referral links for your convenience. Information technology is a way for this site to earn advertising commissions by advertising or linking to certain products and/or services, click here to read my full disclosure policy .
SIDE NOTE: I recommend that yous use a 15 or sixteen gauge nail gun for installing this trim.
SOME TIPS:
- We purchased 4″ pine boards for all the trim (you lot tin use a dissimilar size, but your measurements will be different than the tutorial and so continue that in mind).
- You could purchase a pre-primed board too.
- If you would like to save some fourth dimension downwardly the road, you can paint the boards before installing them.
In this tutorial, I share how to install window trim when the windows do not have any trim installed. If yous are updating your window trim (already take trim around the window), be sure to check out my mail service virtually removing trim without damaging the walls before starting the steps.
Stride 1: DETERMINE THE AMOUNT OF WOOD NEEDED
To calculate the amount of wood you will need, kickoff measure all four sides of the window opening (acme, bottom, & sides).
The summit and bottom pieces volition need to be wider because this craftsman window trim extends three.five" (the width of the vertical pieces) and has an extra overhang of 1".
Thus, yous volition demand to add four.5" to each side of the width of the top & bottom of the window opening.
So, in total, you would be adding 9″ to the measurement of the superlative and bottom window openings.
For case: let's say the window bottom measured 21″ but we need to add 4.five″ to both sides (nine″), our piece would then = 30″.
By now, you should know the number of boards needed for each window and what length to cut them.
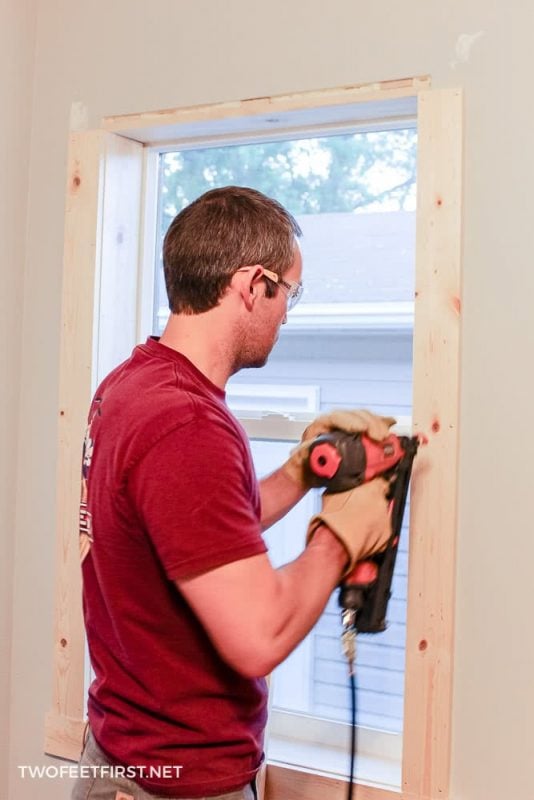
Pace ii: INSTALL THE WINDOW TRIM
The showtime pace to installing the window trim is placing the lesser trim piece.
Take the measurement of the lesser trim piece and cut the board at that length (think to add the actress inches stated in a higher place).
Next, apply Liquid Nails to the wood in a zig-zag fashion, like the picture show below: (this motion-picture show was from adding the window jambs because I forgot to accept a film when adding the trim). This stride can be skipped – the reason why nosotros used Liquid Nails is that our walls are brick with plaster over the brick, so nosotros needed more than than just nails to concur the boards into identify.

After, place the Liquid Nails side of the lath against the wall, i/8″ down from the window opening (jamb).
Centre the board and brand certain it is level; then, nail the lath into identify with 1-iii/four″ nails.

TIP: We marked the lath iv-one/two″ in from both sides before adding the liquid nails. This step will make it easier to heart the board against the window opening.
Now information technology is time for the side trim.
To get the nigh accurate measurement, measure from the lesser trim piece to 1/8″ past the superlative window opening (add 1/4″ to the previous measurement). Make sure y'all measure for both the right & left sides of the window because it could be different.
Then, cut the side pieces and summit slice (retrieve to add the extra inches from Step 1).

After cutting the side pieces & top slice, apply the Liquid Nails to one of the sideboards and place information technology ane/8″ away from the side opening. Make certain the lesser of the side trim is affluent with the lesser trim; level, then nail the board into place.

Install the other side'southward trim piece the same way.
Now that both side pieces are installed, add the top trim slice, again placing Liquid Nails on meridian of the side pieces. Make certain the board is centered and level.
Finally, nail the last trim piece into identify with i-3/4″ nails.
Enjoy your new window trim – your view is now complete!
And equally a notation, some of our trim and jambs accept some gaps, just this can be filled in with a sealant before painting the trim. If y'all want to see how to finish painting the window trim, exist sure to cheque out this tutorial on that.
I hope this tutorial will aid you add interior window trim to your windows. Plus this craftsman style window trim is not difficult to install. Update the await of your windows by installing window trim.
Prep Time 30 minutes
Active Time 1 hour 30 minutes
Additional Fourth dimension 1 hr thirty minutes
Full Fourth dimension 3 hours thirty minutes
Difficulty Easy
Materials
- 4" boards
- one.75" nails
- liquid nails (optional)
Tools
- nail gun & air compressor
- miter saw
- record measure
- level


How To Install Window Trim,
Source: https://www.twofeetfirst.net/install-window-trim/
Posted by: riveracrourt.blogspot.com
0 Response to "How To Install Window Trim"
Post a Comment